Getting Started
Installation
Prerequisities
Cortisol requires one of the following Python versions: 3.8, 3.9, 3.10 or 3.11
Install Cortisol
At the command line:
pip install cortisol
If you have an Apple M1 CPU, we suggest installing using Poetry as a dependency management. Otherwise, the underline gevent library may not work.
Your first log cost estimation
Let's dive right in and get our hands dirty with Cortisol! As an integral part of your software development workflow, Cortisol CLI brings predictability to managing log costs.
First things first! We need a RESTful service and so you'll need to do the following steps:
- Clone this example repo https://github.com/CortisolAI/getting-started-example
cd getting-started-examplemkvirtualenv getting-started-cortisolpython -m app.mainwhich will make the service available athttp://127.0.0.1:8080/
And, now, it's time to create your first cortisol file. Copy and paste the following in a file named cortisolfile.py in the root path of getting-started-example repo:
from locust import task

from cortisol.cortisollib.users import CortisolHttpUser


class WebsiteUser(CortisolHttpUser):
    @task
    def my_task(self):
        self.client.get("/")
Here we define a class for the users that we will be simulating. It must always inherit from CortisolHttpUser <cortisollib.users.CortisolHttpUser>.
We've declared 1 task by decorating two methods with @task. The my_task method calls the root path of the restful service that just returns a simple JSON response.
You can define multiple tasks for each resource of your web service.
Almost there! It's time to run the cortisol command and get your first log cost estimates. Before we do that, make sure you know the root path of where the getting-started-example repo is located. For illustration purposes, let's assume the path is /some/path/getting-started-example/.
Switch to another terminal window, enable the getting-started-cortisol virtual env and run the following command in the terminal:
cortisol logs cost-estimate --host http://127.0.0.1:8080 --users 10 --spawn-rate 5 --run-time 10s --cortisol-file cortisolfile.py --log-file cortisol_app.log
You'll get some results after 10 seconds that look like these ones:
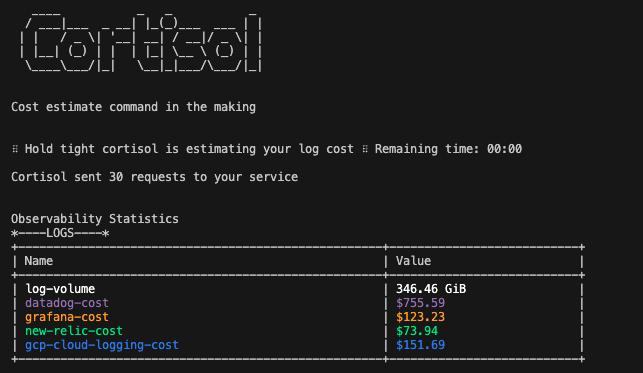
Before we dive into the results, let's understand what load testing ran in the background in order to receive the latter log cost estimates.
--host http://127.0.0.1:8080the FAST API runs athttp://127.0.0.1:8080--users 10The peak number of concurrent users is 10--spawn-rate 5Spawn 5 users per second--run-time 10sStop after 10 seconds--cortisol-file cortisolfile.pypath to cortisolfile--log-file cortisol_app.logpath to where logs are saved
Let's get back to the results. The total log volume per month of running this FAST API with the defined user behaviour in the cortisolfile and in the cortisol command arguments is going to be available at the top of the table. The log costs per observability tool are per month and are explained below:
- Datadog: 30 day log retention and billed annually
- Grafana: Cloud Pro plan is chosen
- New Relic: Pro plan is chosen
- GCP Cloud Logging: based on the pricing on their website
Please, note that free tiers have been included to all the costs above
Your first log cost estimation with Docker
Let's do the same but run the FAST API in a Docker container.
- Clone this example repo https://github.com/CortisolAI/getting-started-example
cd getting-started-examplemake buildto build the Docker imagemake runto run the container. The printed container ID is important. This command will make the service available athttp://127.0.0.1:8080/
On another terminal window:
- Create a virtualenv
mkvirtualenv getting-started-cortisol pip install cortisol
You will need to pass the container ID, and just define the log file name. No need to pass the entire path to the log file:
cortisol logs cost-estimate --host http://127.0.0.1:8080 --users 10 --spawn-rate 5 --run-time 10s --cortisol-file cortisolfile.py --container-id d3a45b9e27ca03b52d2fe9d4c7c55f8254829555c96c6b79bc950caaf33719f8 --cortisol-file ./examples/cortisolfile.py --log-file cortisol_app.log
And, you'll get some results in 10 seconds.
Make sure to run make stop and make clean to stop/delete the Docker image and container.